This post was originally written for my blog at IBM. I had moved from VMWare to KVM because I preferred the flexibility of the open source tools, but I was still learning to work without some of the hand-holding that the GUIer tools provided. Of course, this has all come a ways… but, like most things Linux, the old techniques still work too.
As most of you know, or at least suspect, I run Linux. It’s my lifestyle. However, I have to interact with people who have different lifestyles. This requires a level of tolerance and sometimes even walking in others’ shoes. Yes, I sometimes have to do something that is only available to me through Microsoft Windows. The situations are rare. If I’m in on the front end I’m usually able to get people to agree on more standard information formats that are not necessarily tool-bound so I can work behind the scenes. However, when I’m coming into someone else’s project or meeting I don’t get to influence that at all.
I suppose I do tend to act a little confused that Windows is required for this and say that I’ll need to get hold of a Windows machine that I can use. Then I fire up my virtual machine. I used VMWare for a while, but I just get a little nervous about having important functionality wrapped up in a single, closed-source provider, even when it’s free. In a previous blog post I talked about how I successfully converted my VMWare image to a kvm image. I still haven’t mastered some of the things like getting USB interaction the way I want, but that’s less critical to me right now. It’s been working great for my needs.
However, I ran into a problem. Working in a big corporate environment we have big corporate security snooping. I don’t whine about this. They make computer resources available to me and give me some freedom to manage it myself. (I know some people who have their laptops built for them and are not allowed to do anything with the software.) In exchange for my technical freedoms I think a little compliance verification is reasonable. So, I’m getting nasty grams that my computer is failing tests. I look at things and everything seems fine. Then I realize it could be the seldom-used virtual machine. I fire it up and it does look like it hasn’t completed some of its verification. It needs some updates and such. OK. We’ll let it do its thing.
DOH! My virtual hard drive is full!
I can’t go anywhere with this until I get the updates done. I don’t really want to start from scratch. What do I do?
Well, as it turned out, resizing the virtual KVM drive was pretty easy, and even fun. So, I’m leaving my steps here in case anyone else needs to do it. I will warn you, that messing around with virtual images like this often involves making copies of the whole thing, so you need to have PLENTY of drive space. In my case I have a 2 TB USB drive for backups and archives where these images live. I had hundreds of gigs of space available, so this was not a problem. Most of the information that I got to do this came from the article, “HOWTO: Resize a KVM Virtual Machine Image” on IT.Signals. It largely worked, with a few critical differences. Thanks to Etienne for gettting me pointed in the right direction.
Overview
Basically here are the steps that we are going to do:
- Prepare the virtual drive for expansion by converting it to a raw format
- Create raw empty space of the size we want to grow the drive
- Combine the converted drive with the new space
- Resize the partition
- Convert everything back to the original drive format
I’m doing this in an Ubuntu Linux environment. All of my examples will reflect this. If you are in a similar environment you may have to do things a little differently.
Preparing the virtual drive
When I created my KVM, I used the qcow2 format. This format will only allocate the physical drive space that it requires to hold the filesystem. In other words, if I have a 30GB virtual drive, but am only using 10GB, then my virtual drive file will be 10GB. I tend to use this because it makes the base images more portable. Why push 30GB of bits across the network when you can do it in 10? However, the technique that we’re using to resize the drive works better if everything is in the raw format. (I finally figured this out after about three tries. You’re welcome.)
If you are already using a raw image, then you can skip this step. Otherwise you must convert your existing image to raw so we can append it. Fortunately this conversion is easy and the way I’m doing it, you automatically get a backup of your original, which you want to have anyway. We use the kvm-img program:
| mv MyVM.img MyVM.img.cya # rename the file to a backup name kvm-img convert -O raw MyVM.img.cya MyVM.img.raw # Convert the backup image to raw |
This will take a while to do as it copies gigs of data. When you are done, you will have the original image and a new one in the raw format. The size may grow as it fills in any compressed space with 0s.
Create the appended space
This is pretty straight forward. We are going to create a blank virtual drive. I want to add 20GB to my existing image, so I use kvm-img with these options:
| kvm-img create -f raw addon.raw 20GB |
This happens relatively quickly, compared to the copy. A 20GB file is created which is essentially a bunch of zeroes.
Combine the files
Now we are going to append this blank space to our raw drive. The original instructions had me export both raw drives into yet another file, but I found I could use the existing file and save some time and space.
| cat addon.raw >> MyVM.img.raw |
Resize the partition
Now comes the truly fun part that makes virtual machines so much fun. I’m going to use a downloadable, Linux-based tool to boot this drive image and work with it. Here we’re not really doing much more than if we popped a CD into the drive, but the parameters we’re using can be used to remix a virtual machine on the fly with multiple drive resources. I’ll probably do some experimentation with this later. For now, we’re just going to use it to boot the CD we want.
The tool we are going to use is called gparted. It is included with many distributions and is used to let you manipulate your partitions. As it turns out, the developers of this tool have created a LiveCD which boots a small version of Linux and jumps straight into the tool. Very cool! The CD is available from their download site. Just get the .iso file. You don’t need to burn the CD (though you’ll want this in your kit!). We’ll be using the image to get started.
| kvm -m 512 -hda MyVM.img.raw -cdrom gpar |
Let’s parse that command:
- kvm — start the kvm tool. (You probably knew that.)
- -m 512 — set the memory for this virtual machine to 512 MB. The default is something like 384 MB. I like to give it just a little more to make sure the number crunching isn’t hindered. You can do more or less as you wish, depending on your system resources
- -hda MyVM.img.raw — This file will be the first hard drive in the virtual system. If I wanted to add other drives I could do parameters for -hdb, -hdc, etc. See how interesting that could be? You could define a standard data drive which you then start up at various times with different bootable drives. You wouldn’t be able to run them simultaneously, but you could quickly switch out systems for various things, such as testing.
- -cdrom gpar
ted- live -0.8 .1-3 .is o — This file will be used as the CD. - -boot d — We will boot from the CD. You can select what device is used to boot: a=floppy, c=hard disk, d=cdrom, n=network. This is another parameter that could be pretty interesting from a testing and demo perspective.
KVM will now boot from the gparted CD, taking us directly into the tool (after a few language choices and other confirmations). Figure 1 is a screenshot of the tool in action.
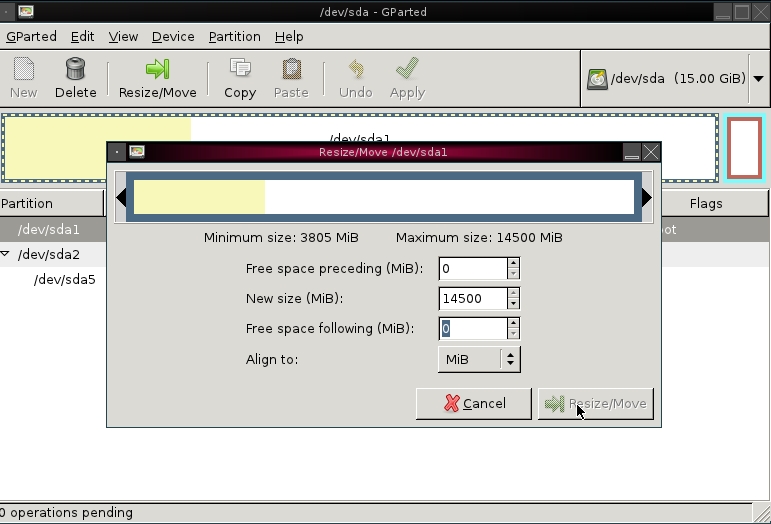
Figure 1. resizing a partition with the gparted LiveCD.
The screen shot is not of my actual editing session with the Windows image. (I finished all that before I knew I was going to write this.) Here I am using the same technique with an Ubuntu Studio image, but the mechanics are the same. Use your mouse to select the partition that you want to resize. Then hit the Move/Resize icon in your navigation bar to edit the partition. In my case it was just a single NTFS partition followed by unallocated space. I simply grew the NTFS and it was fine. If working with partitions like this is new to you, you might want to check out the documentation on the gparted web site.
When you have completed this step, you will have successfully changed the size of your KVM image. It is currently in a raw form, which means that it takes up the full amount of disk space that has been allocated to the virtual drives, but that might be OK for your needs.
Compressing the qcow2 image
If you don’t want to leave your image in the raw format you can convert it back to any format you wish. In my case, I started with a qcow2 image and want to go back. Since the whole point of using qcow2 is to compress the unused space I want to make sure that I take that space back when I convert. Again, kvm-img takes care of my needs.
| kvm-img convert -c -O qcow2 MyVM.img.raw MyVM.img |
Again, let’s look at these parameters in detail:
- kvm-img convert — execute kvm-img in conversion mode (This is not mysterious.)
- -c — Compress the image as it is converted
- -O qcow2 — Use qcow2 as the output format
This will take a while, but when I’m done I will have a fresh, resized version of my kvm image. I will also have the original backup image (.cya) along with the .raw images which can be deleted.
Conclusion
It would really be nice if the imaging tool had it’s own resize feature built in. This was all sort of a pain. However, I was pleased that the process could largely be done with simple file manipulation rather than some sort of monsterous proprietary tool.
As I think about the extra files that were created, I might actually hang onto the 5 GB addon.raw. That way I could easily add multiples of 5GB to an image without having to recreate the file. All I have to do is concatenate this file multiple times to add another 5GB. For example, to add 15GB, I could use the following command:
| cat addon.raw addon.raw addon.raw >> MyKVM.img.raw |
I hope this is helpful to someone. If anyone has comments or suggestion for easier ways to handle this, I’m open. I strongly recommend checking out some of the various LiveCD tools that are floating around like gparted. If you want to fire one up you can use KVM to do it easily, using the same process that we used above.