Chris Walden is a multifaceted guy with a background in technology, writing, and theatrical production. He is the force behind Mythmade Productions in Austin, Texas and enjoys creating unique experiences for people that go beyond mere entertainment. He lives in Cedar Park with his wife, daughter and some number of cats. He is a regular correspondent for Saul Ravencrafts activities.
An element of a culture or system of behavior that may be considered to be passed from one individual to another by nongenetic means, especially imitation.
a humorous image, video, piece of text, etc. that is copied (often with slight variations) and spread rapidly by Internet users.
You see them every day on Google+ and Facebook. These silly pictures get passed around because they speak to us. “Yeah! I think that too.” A while back, a friend of mine, Justin Kirchhoff, asked if everyone just passed these things around or if they actually got creative and did their own.
I realized with my favorite open tools that it was pretty easy to add my own observations and sense of humor. Figure 1 shows the first one that I did, using GIMP.
Figure 1 – My first meme graphic
This was more work than I had planned, as I found a public domain picture with a collection of Victorian gentlemen in hats. I had to cut them all out and arrange them. This was the harder way… but I now had something original to share.
This was a response to all of the posts I was getting that said I didn’t love my family, or support animals, or want to cure terrible diseases if I didn’t pass their message around.
Yesterday I put one up about the World Cup, shown in Figure 3. (Forgive me World Cup fans.)
Figure 3 – the one I did yesterday
Making these kinds of things is pretty easy. In general I always try to make use of images that are in the public domain or available through the Creative Commons license. (If you are unfamiliar with Creative Commons you should check it out. It’s made for people who like the culture of remixing art.) This last one obviously uses an image that belongs to Marvel. I could not sell it or anything like that, but the others I could.
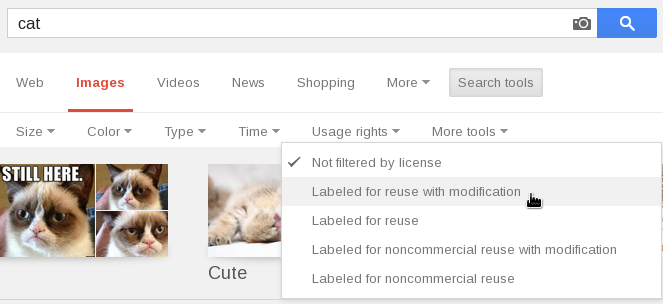
Both GIMP and Inkscape allow you to import images. If I don’t have a picture of my own, I usually do some Google searching. In their image search there is a mechanism to search by license. I did a search for “cat” that was “Labeled for reuse with modification.” See Figure 4. (You may have to click the Search Tools option to see those.)
Figure 4 – Selecting your usage rights in a Google image search
Doing that search found me the lovely picture shown in in Figure 5.
Figure 5 – a face only Mother could love
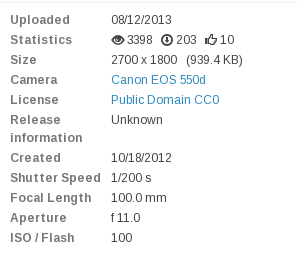
Not all pictures in the search are truly usable. You get some false positives. I always go to the site and do my best to confirm that the picture is available. In this case, the picture came from a site called Pixabay, which specializes in providing freely usable images (bookmarking that!). On the image page there is an information block (Figure 6) that shows this picture is, indeed, public domain. That means I can use it in any way that I wish and even profit from my remixing. Yay!
Figure 6 – information block for cat picture
So now I have my image. For this one I think I’ll use Inkscape, because I don’t really have to do any editing, just add text. Since Inkscape is a vector-drawing program it’s really easy to size and place things. If I had to do some alteration to the image I would probably take it into GIMP. Figure 7 shows the image with added text. I just made a text box and added my phrase. Yellow text showed up well with the picture. A drop shadow helps it to stand out and be readable.
Figure 7 – editing the picture in Inkscape
Inkscape saves things as SVG files so we also want to export the picture as a .png (or .jpg if you prefer). Figure 8 shows is the completed image.
It’s easy enough to recaption this by going back into Inkscape, changing the text and then resaving.
This all may seem ridiculously simple to you… and perhaps it is. I just wanted to point out that with some public domain images and some open-source software you can easily express yourself as well as any meme image that passes by your screen. You don’t have to just share the ones you get. You can start some new ones. Maybe one will go viral!
I’ll be writing about my adventures as an open-source kind of guy, but I do get questions about the software I actually use. I created this Software page to give a starting point for people to see how I get my stuff done. It’s not a comprehensive list, but I’ll add to at as something occurs to me.
If you have questions about a particular piece of software, send a note to me and I may be able to address it here. Please bear in mind that I’m not free tech support. I’m a fellow adventurer in the open-source universe. However, I do enjoy conversation about solving problems and finding ways to innovate with available resources.
Hi! I have an IBM Power workstation running AIX, but I want to install an Open Source OS on it. What do you recommend?
I think POWER is a great architecture and am a little jealous that you have one available.
Without technical details on your specific system it’s hard to give a solid recommendation. IBM has a community for discussion of Linux on POWER. I’ll bet that a question there with details about your machine would get you a solid answer quickly.
Distro.Watch shows a few Linux distributions aimed at the POWER architecture. Yellow Dog Linux used to be the only real recommendation, but now there are a number of choices, including Fedora and Ubuntu. As I recall, the trickiest thing was getting the system into a mode where you load something else… requiring split-second timing with an obscure key-chord. Hopefully it will be easier for you. I really think that you’ll be able to get this going in no time.
Of course, the big Linux news with POWER is POWER8. One of the big sticking points in development for this architecture was the Big Endian/Little Endian issue. Essentially the modes for addressing memory were reversed between some architectures (specifically POWER and Intel) meaning that software written for one had to be rewritten for the other. Yes, there were libraries that helped, but using them cost precious mips (which is why developers were using direct addressing anyway) and many just were not aware enough of the issue to give it any thought. This made traversing platforms a costly venture which many avoided. It also wreaked havoc with open-source projects by requiring some forking of code to support multiple architectures, which often didn’t happen.
So, one of the big news for POWER8 is that has native support for little-endian (Intel-style) addressing. This means that a whole flood of existing Linux (and other) software will likely run on POWER8 with little more than a recompile. According to this IBM page you can get a starting Power System for under $8k. That’s not so bad, all things considered.
I’d like to see POWER make a move back into workstation and laptop space. It’s really efficient for number crunching, which is good for all kinds of graphical and data space. I’d love to see what I could do with Blender on one of those!
I hope this helps you get started, Miron. Let us all know how it goes!
(This entry is a sticky introduction. See the latest posts in the menu on the left.)
My name is Chris Walden. For nearly twenty years now I have been living an open-source lifestyle to one degree or another. I discovered Linux shortly after it was released and began my journey into finding and using open-source alternatives to commercial software. Even though I work for a major technology corporation I do much of my work using open tools. I find them to be an outstanding source for learning about technology and techniques, but I find that most of them just get the job done.
My goal with this site is to document what I feel are useful tools and help others who may be struggling to find affordable software alternatives or to have more flexible options in software.
I will admit that I’m not a heavy-duty developer. My background is more in system administration and desktop support. As a result, I am more in the business of making software work together rather than writing in from scratch. As a result I’m pretty sympathetic to people who don’t want to go into the weeds of how the software works but just want to use it to get things done. I do most of my work in Linux, but I also work with folks in Windows and Mac environments. All my favorite open-source projects run in all of those environments.
My goal is to help make it easier for others to take advantage of open-source and to promote the software and standards in their own sphere of influence. I think some of this will be particularly useful for people in non-profit organizations, small businesses, or home users who want to do something but cannot afford the expensive commercial software required.
Interaction is welcome, though I’m not really here to fight and debate. There are plenty of other places for that. To get the ball rolling, I’ve imported a post I wrote some years ago for an IBM developerWorks blog that I maintained. It’s remained fairly popular. It’s called Start your learning with open source.
This post was originally written for my blog at IBM. I had moved from VMWare to KVM because I preferred the flexibility of the open source tools, but I was still learning to work without some of the hand-holding that the GUIer tools provided. Of course, this has all come a ways… but, like most things Linux, the old techniques still work too.
As most of you know, or at least suspect, I run Linux. It’s my lifestyle. However, I have to interact with people who have different lifestyles. This requires a level of tolerance and sometimes even walking in others’ shoes. Yes, I sometimes have to do something that is only available to me through Microsoft Windows. The situations are rare. If I’m in on the front end I’m usually able to get people to agree on more standard information formats that are not necessarily tool-bound so I can work behind the scenes. However, when I’m coming into someone else’s project or meeting I don’t get to influence that at all.
I suppose I do tend to act a little confused that Windows is required for this and say that I’ll need to get hold of a Windows machine that I can use. Then I fire up my virtual machine. I used VMWare for a while, but I just get a little nervous about having important functionality wrapped up in a single, closed-source provider, even when it’s free. In a previous blog post I talked about how I successfully converted my VMWare image to a kvm image. I still haven’t mastered some of the things like getting USB interaction the way I want, but that’s less critical to me right now. It’s been working great for my needs.
However, I ran into a problem. Working in a big corporate environment we have big corporate security snooping. I don’t whine about this. They make computer resources available to me and give me some freedom to manage it myself. (I know some people who have their laptops built for them and are not allowed to do anything with the software.) In exchange for my technical freedoms I think a little compliance verification is reasonable. So, I’m getting nasty grams that my computer is failing tests. I look at things and everything seems fine. Then I realize it could be the seldom-used virtual machine. I fire it up and it does look like it hasn’t completed some of its verification. It needs some updates and such. OK. We’ll let it do its thing.
DOH! My virtual hard drive is full!
I can’t go anywhere with this until I get the updates done. I don’t really want to start from scratch. What do I do?
Well, as it turned out, resizing the virtual KVM drive was pretty easy, and even fun. So, I’m leaving my steps here in case anyone else needs to do it. I will warn you, that messing around with virtual images like this often involves making copies of the whole thing, so you need to have PLENTY of drive space. In my case I have a 2 TB USB drive for backups and archives where these images live. I had hundreds of gigs of space available, so this was not a problem. Most of the information that I got to do this came from the article, “HOWTO: Resize a KVM Virtual Machine Image” on IT.Signals. It largely worked, with a few critical differences. Thanks to Etienne for gettting me pointed in the right direction.
Overview
Basically here are the steps that we are going to do:
Prepare the virtual drive for expansion by converting it to a raw format
Create raw empty space of the size we want to grow the drive
Combine the converted drive with the new space
Resize the partition
Convert everything back to the original drive format
I’m doing this in an Ubuntu Linux environment. All of my examples will reflect this. If you are in a similar environment you may have to do things a little differently.
Preparing the virtual drive
When I created my KVM, I used the qcow2 format. This format will only allocate the physical drive space that it requires to hold the filesystem. In other words, if I have a 30GB virtual drive, but am only using 10GB, then my virtual drive file will be 10GB. I tend to use this because it makes the base images more portable. Why push 30GB of bits across the network when you can do it in 10? However, the technique that we’re using to resize the drive works better if everything is in the raw format. (I finally figured this out after about three tries. You’re welcome.)
If you are already using a raw image, then you can skip this step. Otherwise you must convert your existing image to raw so we can append it. Fortunately this conversion is easy and the way I’m doing it, you automatically get a backup of your original, which you want to have anyway. We use the kvm-img program:
mv MyVM.img MyVM.img.cya # rename the file to a backup name
kvm-img convert -O raw MyVM.img.cya MyVM.img.raw # Convert the backup image to raw
This will take a while to do as it copies gigs of data. When you are done, you will have the original image and a new one in the raw format. The size may grow as it fills in any compressed space with 0s.
Create the appended space
This is pretty straight forward. We are going to create a blank virtual drive. I want to add 20GB to my existing image, so I use kvm-img with these options:
kvm-img create -f raw addon.raw 20GB
This happens relatively quickly, compared to the copy. A 20GB file is created which is essentially a bunch of zeroes.
Combine the files
Now we are going to append this blank space to our raw drive. The original instructions had me export both raw drives into yet another file, but I found I could use the existing file and save some time and space.
cat addon.raw >> MyVM.img.raw
Resize the partition
Now comes the truly fun part that makes virtual machines so much fun. I’m going to use a downloadable, Linux-based tool to boot this drive image and work with it. Here we’re not really doing much more than if we popped a CD into the drive, but the parameters we’re using can be used to remix a virtual machine on the fly with multiple drive resources. I’ll probably do some experimentation with this later. For now, we’re just going to use it to boot the CD we want.
The tool we are going to use is called gparted. It is included with many distributions and is used to let you manipulate your partitions. As it turns out, the developers of this tool have created a LiveCD which boots a small version of Linux and jumps straight into the tool. Very cool! The CD is available from their download site. Just get the .iso file. You don’t need to burn the CD (though you’ll want this in your kit!). We’ll be using the image to get started.
kvm -m 512 -hda MyVM.img.raw -cdrom gparted-live-0.8.1-3.iso -boot d
Let’s parse that command:
kvm — start the kvm tool. (You probably knew that.)
-m 512 — set the memory for this virtual machine to 512 MB. The default is something like 384 MB. I like to give it just a little more to make sure the number crunching isn’t hindered. You can do more or less as you wish, depending on your system resources
-hda MyVM.img.raw — This file will be the first hard drive in the virtual system. If I wanted to add other drives I could do parameters for -hdb, -hdc, etc. See how interesting that could be? You could define a standard data drive which you then start up at various times with different bootable drives. You wouldn’t be able to run them simultaneously, but you could quickly switch out systems for various things, such as testing.
-cdrom gparted-live-0.8.1-3.iso — This file will be used as the CD.
-boot d — We will boot from the CD. You can select what device is used to boot: a=floppy, c=hard disk, d=cdrom, n=network. This is another parameter that could be pretty interesting from a testing and demo perspective.
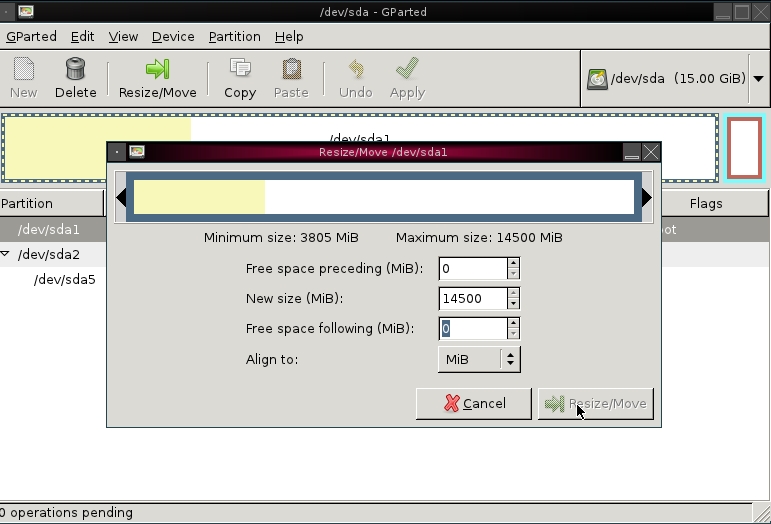
KVM will now boot from the gparted CD, taking us directly into the tool (after a few language choices and other confirmations). Figure 1 is a screenshot of the tool in action.
Figure 1. resizing a partition with the gparted LiveCD
Figure 1. resizing a partition with the gparted LiveCD.
The screen shot is not of my actual editing session with the Windows image. (I finished all that before I knew I was going to write this.) Here I am using the same technique with an Ubuntu Studio image, but the mechanics are the same. Use your mouse to select the partition that you want to resize. Then hit the Move/Resize icon in your navigation bar to edit the partition. In my case it was just a single NTFS partition followed by unallocated space. I simply grew the NTFS and it was fine. If working with partitions like this is new to you, you might want to check out the documentation on the gparted web site.
When you have completed this step, you will have successfully changed the size of your KVM image. It is currently in a raw form, which means that it takes up the full amount of disk space that has been allocated to the virtual drives, but that might be OK for your needs.
Compressing the qcow2 image
If you don’t want to leave your image in the raw format you can convert it back to any format you wish. In my case, I started with a qcow2 image and want to go back. Since the whole point of using qcow2 is to compress the unused space I want to make sure that I take that space back when I convert. Again, kvm-img takes care of my needs.
kvm-img convert -c -O qcow2 MyVM.img.raw MyVM.img
Again, let’s look at these parameters in detail:
kvm-img convert — execute kvm-img in conversion mode (This is not mysterious.)
-c — Compress the image as it is converted
-O qcow2 — Use qcow2 as the output format
This will take a while, but when I’m done I will have a fresh, resized version of my kvm image. I will also have the original backup image (.cya) along with the .raw images which can be deleted.
Conclusion
It would really be nice if the imaging tool had it’s own resize feature built in. This was all sort of a pain. However, I was pleased that the process could largely be done with simple file manipulation rather than some sort of monsterous proprietary tool.
As I think about the extra files that were created, I might actually hang onto the 5 GB addon.raw. That way I could easily add multiples of 5GB to an image without having to recreate the file. All I have to do is concatenate this file multiple times to add another 5GB. For example, to add 15GB, I could use the following command:
I hope this is helpful to someone. If anyone has comments or suggestion for easier ways to handle this, I’m open. I strongly recommend checking out some of the various LiveCD tools that are floating around like gparted. If you want to fire one up you can use KVM to do it easily, using the same process that we used above.
Did you ever want to turn to a manager, or someone in marketing, or just anyone who doesn’t live personally through the pain of what it takes to move an application from concept to clickability and say “If you think it’s so easy, why don’t you just do it yourself?” If you are currently employed as a developer it’s likely that you have resisted that rather career-limiting urge. Yet, dreams can come true. Google has released a tool called the “App Inventor,” which provides a drag-and-drop environment which will allow anyone who can design a slide presentation to put together an Android application.
The good news, is some of the more ridiculous application requests may take care of themselves. The bad news is that this will make for a lot of weird stuff out there in the Android application market.
App Inventor runs across platforms, which is the typical Google way. I haven’t tried it out yet, but I will soon. Maybe I’ll post some sort of weird app for you to enjoy. If you do something with it, why not upload it onto My dW and share it?
UPDATE FROM 11/14/2014: As I reposted this I was pleased to see that all the videos were still intact. Yay, YouTube museum! I also have to admit that since I posted these I actually found an Intellivision on eBay and had to buy it. My 12-year old was not very impressed… but I had fun! I ended up having to get an old VCR at GoodWill to connect it into the TV.
Valerie Skinner commented that she’s run across a lot of technical people who got their start on the Commodore 64. I was one of them!
I did some quick digging and thought I’d share a few blasts from the past about the good ol’ days of computing.
This just in… or at least into my inbox: “Google Closes the Blinds on Windows”
It looks like the company, which successfully became a verb, and has built a love/hate relationship for many in the technology world has made a choice. Apparently they are in the process of removing Windows from the organization and offering Linux or Mac for all of their users. In this report, Andrew Storms, the director of security operations at nCircle Security, comments that the move smells more like cost-cutting than security. “[But it’s] been cleverly spun into a PR effort to strike at Microsoft,” he said.
Even if it is a cost-cutting move, so what? If removing Windows from your organization saves money, money that one might want for other things, like paying employees, marketing, development of new business, things that go way beyond providing a platform on which to run your applications, what’s wrong with that? If you could buy fuel for your car more cheaply and still get where you want to go, wouldn’t you do it? If you could refinance your mortgage and get a better deal, wouldn’t you do it?
As the open-source movement continues to provide multi-platform tools and as more and more functionality moves into the browser, the platform running your applications becomes less and less relevant. For many, the only thing really holding them from making such a move is the will to move. If this all really goes through as rumored, perhaps that example will provide will for other companies and individuals to officially make the change that they’ve been hinting at for years. If that happens, it will make some interesting changes in the software and hardware industries. Developers who have kept their development Windows-centric, claiming that there was no point in supporting anything else but Windows may suddenly discover that they have multi-platform approaches after all.
I think that finally breaking that ice will help computing to integrate in areas that have been held up. I remember several years ago seeing some of the technology concepts which had your house working together. IBM had this ad about how little bits of technology planted around could make life easier. Frankly, I think centering our computing around Windows has made it very difficult to do this sort of ubiquitous technology. It wasn’t that it wasn’t possible to have more integration between Windows and things that couldn’t run Windows. It just didn’t appear to be easy for some reason. As a Linux user, I became frustrated with the ways that gadgets I would get came packaged with all of this Windows software with no information about how to interact with the device in any other way. Generally this was not a problem, because in many cases Linux would recognize the device as a file system or something and I stumbled across an open-source tool to help me out. A good example is the calibre program which I use to manage my Sony book reader. It makes book management very easy to deal with and even helps me convert between formats to make for a better experience. I can group ebooks together in a series to help me find them and read them in order. It’s nice. (It’s also multi-platform!) A bad example is my TomTom navigator, which, despite the fact that it uses Linux as it’s operating system, has it’s interface software only available in Windows (and more recently Mac OS X). It’s begun to be supplanted by my Droid phone for navigation… which is a shame because I think the TomTom does a better job in many ways.
It’s all about standards. Not “this is the only platform that people should use so you should only bother programming with our tools in our way” sort of standards, but true open standards that are independent of tools and platforms. The more we adopt predictable ways for technology to communicate the easier it will be for people to create devices and software that can do it. Perhaps this sort of quaking in the desktop world will cause people to wonder what they’ll do if the market changes, and they’ll start reaching for those standards. Whatever happens next, I think it’s going to be interesting.
In my last blog entry I got to wondering about Disney’s relationship with open-source software. So, I did a little casual Googling (is that a word?) and found some truly amazing information. Disney not only uses open-source software, they contribute!
My first discovery was the technology site for Disney Animation: http://www.disneyanimation.com/technology/
The site has two sections. Publications deals with techniques applicable to 3D animation. It’s pretty in-depth stuff which I should think would be of use to anyone who is working with these technologies. The Technology section has two projects: Ptex, which is a texture mapping system that requires no UV assignment. Pythoscope is a unit test generator for programs written in Python. These are substantial contributions which probably could have been sold commercially. The choice to open them up is tremendous.
Of course, it turns out that this is not a new thing for Disney. I found that as far back as ten years ago Disney donated the Tea Template Language into the open source. It has now been joined by a collection of other technologies which reside at the Tea Trove.
While I don’t have any specific information or statistics, I have heard that Disney uses Linux in various places throughout their organization, both on the backend and in a workstation capacity. I’d love to get more details, because I have always been impressed with Disney’s ability to innovate. What intrigues me about Disney and open source is that they don’t have to use it for cost reasons. They can afford to buy plenty of software. If they are doing open source it means that it has intrinsic value.
I don’t have a killer thought to take you home here. If any of you are more connected with what Disney is doing with open source, please tell more.
There may not be a whole lot of open-source involved in this… though there might be. Who knows? But it’s just cool. I’ve always been impressed with Walt Disney’s approach to embracing technology to give us extraordinary experiences. This demo shows a new direction that they are headed to add more life to their costume characters. It’s really quite amazing and shows the future of where technology and entertainment will continue to work to blur the lines between fantasy and reality.
Living and sharing the lifestyle of an open-source kinda guy.